Showing posts with label Linux. Show all posts

Sunday, October 25, 2026

updatejdk 2.0.0: Keep Your JDKs Up to Date – Without a Package Manager

I have just released updatejdk.sh 2.0.0, a single Bash script that lists, installs, updates and downloads JDKs and JREs on macOS and Linux. It installs Eclipse Temurin by default, and other distributions like Zulu, Corretto or Liberica if you ask for them. It verifies every download by its checksum, and one command brings everything you have installed up to date.

Why another JDK tool?

I like to keep several feature versions side by side, sometimes from different vendors, and I don't want a package manager or a runtime of its own just for that. The vendors publish plain tarballs, and their APIs say which release is the latest. A small script is enough to put the two together.

updatejdk.sh is a new development based on the ideas of update_jdk from my bashberries project. The last version of update_jdk was 1.20.0, so the version numbers continue at 2.0.0. Unlike its predecessor, it looks up the releases by the Adoptium API and the foojay Disco API rather than taking a URL. It also knows which version is installed, and it handles several distributions, architectures and operating systems.

Getting started

It is one file:

curl -fsSL -o updatejdk.sh https://bit.ly/updatejdk

chmod +x updatejdk.sh


You need bash, curl and tar. You also need jq, but if it is missing, as on macOS before Sequoia, the script downloads a verified copy for the run.

A quick tour

What is available, and what is installed?

$ ./updatejdk.sh -l 21

Asking https://api.adoptium.net/v3 for Temurin 21 releases for macOS aarch64 ...


  VERSION   TYPE  LATEST               FORMATS          INSTALLED

  --------- ----- -------------------- ---------------- ---------

* 21 LTS    jdk   jdk-21.0.13+9        tar.gz pkg       21.0.13+9-LTS (up to date) /Library/Java/JavaVirtualMachines/temurin-21.jdk

  21 LTS    jre   jdk-21.0.13+9        tar.gz pkg


Installed variants are marked with *. If you also have Zulu or Corretto installed, -l lists them as well, each in a table of its own.

Installing and updating:

updatejdk.sh -i lts           # the JDK of the most recent LTS release

updatejdk.sh -i 21:jre        # the JRE of Java 21

updatejdk.sh -i 21 -a zulu    # Azul Zulu 21 from the foojay Disco API

updatejdk.sh -u               # update everything, each from its own source

updatejdk.sh -u -n            # dry run: which updates are there?


A variant is <feature-version>[:jdk|:jre][:<architecture>], and lts and latest work as feature versions too. -l -a lists all distributions you can choose from.

Your own directory with -d/--dir

By default, installations go to /Library/Java/JavaVirtualMachines on macOS and /usr/lib/jvm on Linux. With -d, they go to a directory of your own, and no root privileges are needed. You can use it for a sandbox or a CI cache, but the use case I care most about is bundling runtimes with an application.

Say you build a macOS app on an Intel Mac and want to ship a universal DMG that runs on both Intel and Apple Silicon. You need a JRE for each architecture, and -d gets you both:

updatejdk.sh -d build/jre -i 21:jre:x64       # -> build/jre/temurin-21.jre

updatejdk.sh -d build/jre -i 21:jre:aarch64   # -> build/jre/temurin-21-aarch64.jre

updatejdk.sh -d build/jre -u                  # updates both later


A few details make this practical:

  • Only an installation for another architecture than the machine's has the architecture in its name, so the two don't collide.

  • After unpacking, the script checks that the archive really is for the requested architecture, according to the OS_ARCH of its release file.

  • Another architecture can only be installed with -d, so it never gets in the way of java_home or update-alternatives.

  • -l aarch64 shows what is available for Apple Silicon and marks what you have.

  • -t and -z need to run that java. On an Intel Mac, an aarch64 Java can't run, so the script skips both for it with a warning.

And if your build needs a stable path, -L maintains a relative symbolic link to the installed variant, e.g. build/jre/latest -> temurin-21.jre/Contents/Home.

Just the packages with -g/--get

Sometimes you don't want to install anything, just get the package, e.g. for a Windows installer:

updatejdk.sh -g 21:jre:x64 --os windows                # the zip

updatejdk.sh -g 21:jre:x64 --os windows --package msi  # the installer

updatejdk.sh -g 21:jre --package pkg                   # the macOS installer


The package is verified like an installation and saved together with a .sha256 file, so you can check it later by shasum -a 256 -c.

Trust, but verify

Nothing is installed without a checksum. The script takes the SHA-256 from the Adoptium API, from foojay, or from the checksum file next to the package. For Corretto, it uses Corretto's own latest_sha256 endpoint. Liberica only publishes a SHA-1, which is accepted with a note. The script also checks the size, and it refuses archives with absolute paths or `..`. A network error stops the script with its cause, rather than being taken for a missing release.

Linux notes

On Linux, the script supports glibc and musl (Alpine). Installations in /usr/lib/jvm are registered with update-alternatives, with the feature version as the priority, so your distribution's default stays selected. Directories that belong to a system package, like the Temurin RPM, are left to apt or dnf. The script uses sudo, or doas on systems that only have that. If a command like curl is missing, as on a fresh Ubuntu desktop, it tells you the command that installs it.

On both macOS and Linux, -z also updates the time zone data of your installations by Oracle's tzupdater.

Tested on

  • macOS on Apple Silicon, macOS 15 Sequoia (x64) and macOS 14 Sonoma (x64)

  • Ubuntu 26.04 LTS (x64) and Ubuntu 26.04.1 LTS (aarch64)

  • Rocky Linux and Alpine Linux (x64) with Temurin, during development

Get it

The source, the README with all the details, and the release notes are on GitHub: https://github.com/jonelo/updatejdk. Bug reports and wishes are welcome as issues there. updatejdk.sh is licensed under the Apache License 2.0.

updatejdk is an independent project. It is not affiliated with, endorsed or sponsored by Oracle, the Eclipse Foundation or any vendor of the distributions it installs. Java and OpenJDK are trademarks or registered trademarks of Oracle and/or its affiliates; Eclipse Temurin is a trademark of the Eclipse Foundation.


Saturday, July 19, 2025

Fixing the 15W charging limit on a ThinkPad X280 by flashing the Winbond 25Q80DV with TB firmware

The problem

On startup a X280 was showing the following error message:

The connected AC adapter has a lower wattage than the recommended AC adapter
which was shipped with the system. To use AC power, please connect the AC
adapter which was shipped with the system.
Press the ESC key to continue.

The error message on the screen: 


And altough there was a power supply unit attached with 45 W or 65 W, Lenovo Vantage shows that the laptop loads with 15 W only:

It was constantly discharging the battery while working on the laptop, because 15 Watts were not enough to satisfy the actual power demand. Slow charging was possible, but only when the laptop was switched off actually.


The solution

After hours of reading articles on the web and several unsuccessful tests including the official way by Lenovo I came along the instructions at https://www.reddit.com/r/thinkpad/comments/1gyv56s/guide_how_to_flash_a_t480s_thunderbolt_firmware/ which worked like a charm also for the X280. 

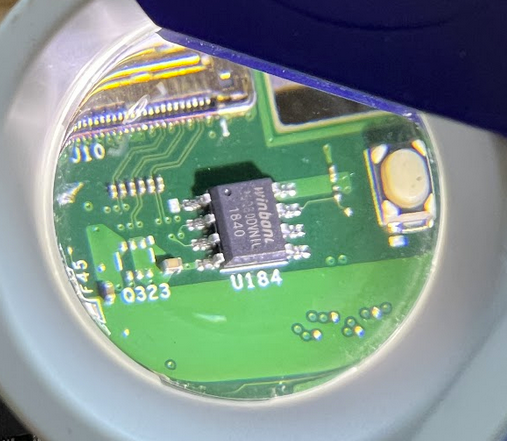
The only thing worth to add here are images to show you how to find the required chip on the X280 logic board. Go to the BIOS and disable the battery. Remove the bottom case from the laptop. Now you need to remove the black plastic foil in the upper right corner and underneeth you find the Winbond 25Q80DV chip that we are going to flash with the Thunderbolt Firmware for the X280.

The chip under a magnifying glass:

The chip gripped by the pliers:


The whole little setup with a connection between the chip and a Linux box by using the CH341A programmer:


Install flashrom packages on Linux

$ sudo apt install flashrom

we need to check whether the connection can be established ...  

$ sudo flashrom -p ch341a_spi
flashrom unknown on Linux 6.14.0-24-generic (x86_64)
flashrom is free software, get the source code at https://flashrom.org

Using clock_gettime for delay loops (clk_id: 1, resolution: 1ns).
Found Winbond flash chip "W25Q80.V" (1024 kB, SPI) on ch341a_spi.
===
This flash part has status UNTESTED for operations: WP
The test status of this chip may have been updated in the latest development
version of flashrom. If you are running the latest development version,
please email a report to flashrom@flashrom.org if any of the above operations
work correctly for you with this flash chip. Please include the flashrom log
file for all operations you tested (see the man page for details), and mention
which mainboard or programmer you tested in the subject line.
Thanks for your help!
No operations were specified.


The chip has been found. Let's backup the content of the chip, just in case something goes wrong ...

$ sudo flashrom -p ch341a_spi -r winbond-backup.bin
flashrom unknown on Linux 6.14.0-24-generic (x86_64)
flashrom is free software, get the source code at https://flashrom.org

Using clock_gettime for delay loops (clk_id: 1, resolution: 1ns).
Found Winbond flash chip "W25Q80.V" (1024 kB, SPI) on ch341a_spi.
===
This flash part has status UNTESTED for operations: WP
The test status of this chip may have been updated in the latest development
version of flashrom. If you are running the latest development version,
please email a report to flashrom@flashrom.org if any of the above operations
work correctly for you with this flash chip. Please include the flashrom log
file for all operations you tested (see the man page for details), and mention
which mainboard or programmer you tested in the subject line.
Thanks for your help!
Reading flash... done.


A backup file has been created, now let's create a 1 MiB file full of nulls ...

$ dd if=/dev/zero of=null.bin bs=1M count=1
1+0 records in
1+0 records out
1048576 bytes (1.0 MB, 1.0 MiB) copied, 0.00205349 s, 511 MB/s


Let's erase the chip ...

$ sudo flashrom -p ch341a_spi -E
flashrom unknown on Linux 6.14.0-24-generic (x86_64)
flashrom is free software, get the source code at https://flashrom.org

Using clock_gettime for delay loops (clk_id: 1, resolution: 1ns).
Found Winbond flash chip "W25Q80.V" (1024 kB, SPI) on ch341a_spi.
===
This flash part has status UNTESTED for operations: WP
The test status of this chip may have been updated in the latest development
version of flashrom. If you are running the latest development version,
please email a report to flashrom@flashrom.org if any of the above operations
work correctly for you with this flash chip. Please include the flashrom log
file for all operations you tested (see the man page for details), and mention
which mainboard or programmer you tested in the subject line.
Thanks for your help!
Erasing and writing flash chip... Erase/write done.


Write all the nulls to the chip ...

$ sudo flashrom -p ch341a_spi -w null.bin
flashrom unknown on Linux 6.14.0-24-generic (x86_64)
flashrom is free software, get the source code at https://flashrom.org


Using clock_gettime for delay loops (clk_id: 1, resolution: 1ns).
Found Winbond flash chip "W25Q80.V" (1024 kB, SPI) on ch341a_spi.
===
This flash part has status UNTESTED for operations: WP
The test status of this chip may have been updated in the latest development
version of flashrom. If you are running the latest development version,
please email a report to flashrom@flashrom.org if any of the above operations
work correctly for you with this flash chip. Please include the flashrom log
file for all operations you tested (see the man page for details), and mention
which mainboard or programmer you tested in the subject line.
Thanks for your help!
Reading old flash chip contents... done.
Erasing and writing flash chip... Erase/write done.
Verifying flash... VERIFIED.


Disconnect the pliers, boot the laptop, disable battery again in BIOS, shutdown the laptop and reconnect the pliers again. The original Thunderbolt firmware (from Lenovo, extracted from the .exe) is called TBT.bin ...

$ ls -la TBT.bin
-rwxr-xr-x 1 johann johann 262144 Jul 8 2022 TBT.bin
johann@x250:~$ cp TBT.bin TBT-backup.bin


We need to pad the TBT.bin with nulls to have a 1 MiB file ...

$ dd if=/dev/null of=TBT.bin bs=1 seek=1048576
0+0 records in
0+0 records out
0 bytes copied, 6.4913e-05 s, 0.0 kB/s
johann@x250:~$ ls -la TBT.bin
-rwxr-xr-x 1 johann johann 1048576 Jul 18 20:11 TBT.bin


We flash the content of the updated TBT.bin to the chip ...

$ sudo flashrom -p ch341a_spi -w TBT.bin
flashrom unknown on Linux 6.14.0-24-generic (x86_64)
flashrom is free software, get the source code at https://flashrom.org

Using clock_gettime for delay loops (clk_id: 1, resolution: 1ns).
Found Winbond flash chip "W25Q80.V" (1024 kB, SPI) on ch341a_spi.
===
This flash part has status UNTESTED for operations: WP
The test status of this chip may have been updated in the latest development
version of flashrom. If you are running the latest development version,
please email a report to flashrom@flashrom.org if any of the above operations
work correctly for you with this flash chip. Please include the flashrom log
file for all operations you tested (see the man page for details), and mention
which mainboard or programmer you tested in the subject line.
Thanks for your help!
Reading old flash chip contents... done.
Erasing and writing flash chip... Erase/write done.
Verifying flash... VERIFIED.
$


Disconnect the pliers, reboot the laptop. And now the boot error message is gone. And also Vantage recognizes the correct value of 45 Watts of the attached power supply ...


Don't forget to tighten up the screws that hold the bottom case.
 
Mission completed.
 

Sunday, March 11, 2018

... and all I got was this lousy T-shirt

To be honest, it is not a lousy T-shirt at all, it is great T-shirt from the Linux Foundation actually. It has a simplified Tux icon and a little riddle on its front:


Warning: don't scroll down if you want to solve the riddle by your own. Scroll down in order to see how I solved the riddle.
.
.
.
.
.
.
.
.
.
.
   2nd WARNING
   DON'T SCROLL DOWN IF YOU WANT TO SOLVE IT BY YOUR OWN !!!
.
.
.
.
.
.
.
.
.
.
   Last WARNING
   Ok, either you have solved the riddly by your own or you are simply too curious ;-)
   OK, FEEL FREE TO SCROLL DOWN IF YOU WANT TO SEE THE SOLUTION !!!
.
.
.
.
.
.
.
.
.
Actually, I was wondering whether I can solve the riddle by using the NumericalChameleon (yeah, you know I am the author of it, don't you?) and I am glad to announce that it can be used to solve the riddle as well. I entered the bitstream at the category "Positional Notations, Radix 2-36", and converted the value to hex. Since the Unicode character set is a superset of ASCII, and numbers 0 - 127 have the same meaning in ASCII as they have in the Unicode character set, it was possible to prefix each hex number by 00 in order to satisfy the expected input format at the "Unicode® Characters (Basic Multilingual Plane)" category. Below you see screenshots of both the NumericalChameleon (with the solution) and a hex editor in the background (with the solution) in order to verify the result.